
You've just finished installing your Link ECU, and you've attempted your first start, but the engine isn't starting. Or maybe your engine was running and now it's stopped and won't start. Either way, this article will guide you through the process of solving the reason why your engine won't run.
Three things before we start:
- All Link ECUs are rigorously tested before sale, for 18 hours they are cycled between -15°c and +70°c, whilst each input and output is tested thousands of times. Only once the ECU has passed our strict quality standards is that ECU ready for sale. No ECU that fails is sold. So we will approach this from a perspective that there is no fault with the ECU.
- You are unlikely to cause damage to your engine, ECU or wiring by following this guide, however, care must be taken this is a guide only, Link Engine Management Ltd has no liability to the original purchaser or any other person for any loss, injury or damage to persons or property resulting from the use of the ECU or any failure of or defect in the ECU whether by general, special, direct, indirect, incidental, consequential, exemplary, punitive, or any other damages of any kind or nature whatsoever.
- Just because the factory ECU runs the engine in the current format, doesn't mean the Link ECU can. Factory ECUs only need to run 1 type of engine and are able to detect and recover from modified wiring in ways which we cannot.
1. Does your ECU have power?
So obviously the ECU needs power to run, so it can run the engine. This is easy to check and the first place to look, before we can do anything else, we need to confirm the ECU is even powered!
All Link ECUs have LED indicators to determine whether the ECU is receiving power.
On all wire in ECUs this can be found on the front of the ECU next to the A plug.
This LED doubles as a check engine light, don't panic if it is flashing, this just indicates a fault code, it may be the reason your engine isn't starting, but it may be a stored fault code from during your installation process.
On plugin ECUs there are two LEDs on the top board, one is a power LED, the other is a CE LED, as above, if the CE light is flashing, don't panic just yet.
If your ECU should have power, and the LED is not lit, check the following:
- Fuses
- Relays
- Inspect the ECU Plug, refer to the manual for power and ground pinout information.
- If you have a plugin, you may have additional switches or jumpers that need to be set for your specific year, model, or locale. Refer to the manual for options.
- If it is a plugin ECU, inspect the PCB, headers and pins for damage, black or brown soot, or damaged or missing components.
- Make sure your battery is charged to at least 12V.
Once you have confirmed the LED is on, connect to your ECU with PCLink.
2. Is your ECU Unlocked?
Do you see a message when you connect to your ECU explaining that it is locked?
If you go to ECU Controls > ECU Unlock and the ECU Enabled box is not checked then your engine will not start and you need to contact the dealer you purchased the ECU from for the unlock code.
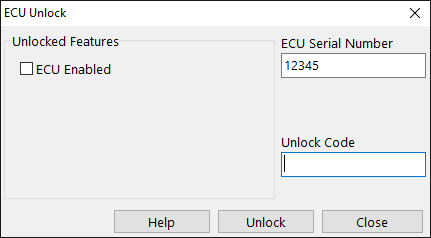
See this topic for details on ECU Unlocks:
TODO: ECU UNLOCK TOPIC
3. Does your ECU have triggers?
Your ECU needs to know the speed your engine is rotating at, and what position the engine is in. It does this with "triggering". We'll cover everything about triggers in a different article, but all we need to know now is whether your ECU is receiving sufficient information from your trigger sensors to start the engine.
Open PCLink, connect to your ECU, press F12 (sometimes you need to press Fn + F12) or the R key to see the Runtime Values window. Press [ and ], or use your mouse to navigate to the "Triggers/Limits" Tab.
Crank your engine for 5-15 seconds and watch for a few things:
- Engine Kill should be Inactive, % Fuel Cut and % Ignition Cut should be zero and should stay this way while you crank.
- Trig 1 Signal and Trig 2 Signal should turn from No to Yes. (Trig 2 will only turn to Yes if you have a cam or "sync" sensor)
- Engine Speed should show a value, anything from 150-500 is a good start. It probably shouldn't be over 1500, and it certainly shouldn't jump erratically between 0 and 200 or 200 and 4000 for example.
- Trig 1 Err Counter may increase by 1 or 2, but it should not count up as you keep cranking.
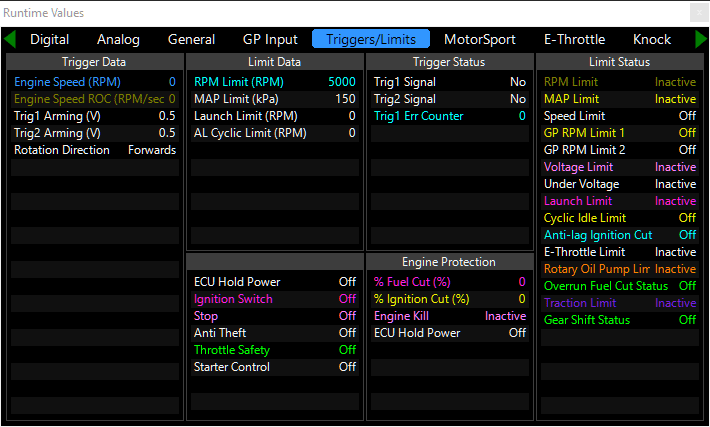
If Engine Kill, or either of the cuts become active, skip ahead to section 7.
Trig 1 Signal and Trig 2 Signal are quick checks that answer the question: "Is the ECU seeing any voltage movement on the trigger pins at all?", it may not be the right signal, it might be upside down, or full of noise or too weak, but, if the ECU cannot detect a signal, then it cannot start the engine.
If you do not have Trig 1 Signal and/or Trig 2 Signal:
- Check fuses and relays, some trigger sensors are powered separately from the ECU.
- If you have a plugin, check Jumper and switch settings in your manual.
- Check your Trigger 1 Type and Trigger 2 Type settings match your sensor types. (Typically 3 wire sensors are Hall effect, and 2 wire sensors are VR/Reluctor)
- If you have 3 wire (Hall effect) sensors, they likely need the pull up resistor turned on.
- Check your starter motor is actually working - you should hear the engine turn.
Link ECUs are able to control starter motors, but it is rare for them to do so. Unless you have a push-to-start system setup, if your starter motor doesn't work, it is unlikely to be an ECU fault. - Sometimes moving on to a trigger scope can help.
If you have issues with 3 and 4, move on to the next step.
4. What do the triggers look like?
We've determined you have a signal, but the engine still wont run, so lets look at what the signal looks like. It may be misshapen, inverted, full of noise, too weak, or have a myriad of other weird issues which could cause the ECU not to start the engine.
If you have a newer G4X ECU (part number xxx-4000), or a G4+ Storm or above we can use the Trigger Scope function built into the ECU to diagnose the triggers.
If you have a G4X Atom or Monsoon, you'll get a partial Trigger Scope - it can still be useful, we'll cover it separately below.
If you have any other model of Link ECU, you'll need an oscilloscope, and you'll need to backprobe the pins on your ECU - this is outside the scope of this article.
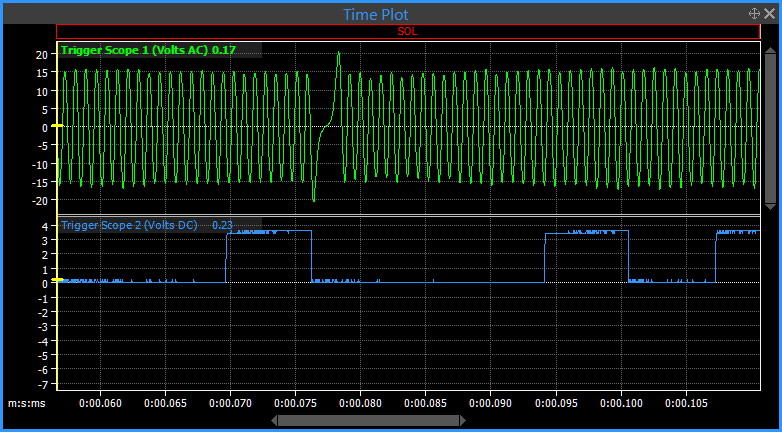
Still connected to the ECU, in PCLink go to ECU Controls > Trigger Scope.
Essentially:
- Start Cranking
- Press Capture
- Continue to Crank for 10-15 seconds
- Until you see something like the image below (yours may be very different)
- Click Save
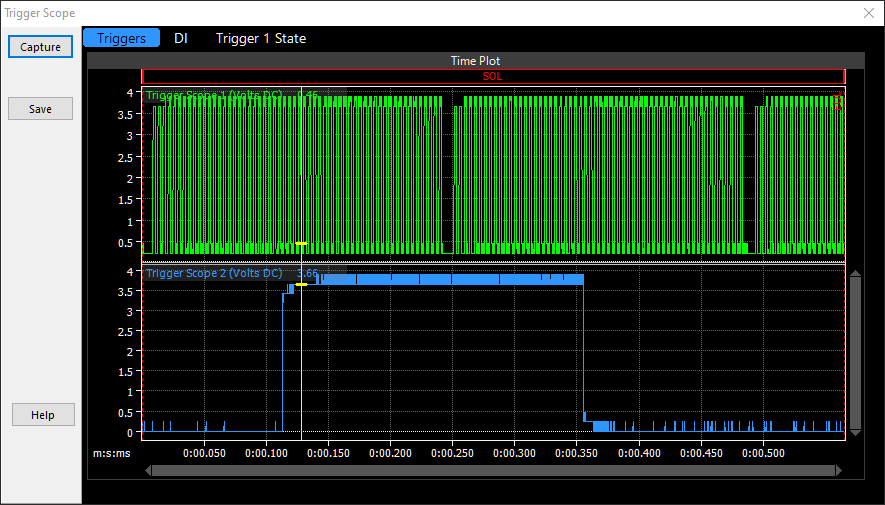
Reading and Diagnosing a Trigger Scope is an entire article of it's own.
|
Bad Scope |
Good Scope |

If you have a bad scope, or you're unsure, see these topics in the helpfile:
- G4X ECU Tuning Functions > Triggers
- G4X ECU Tuning Functions > Triggers > Solving Triggering Issues
- Wiring Information > Input Signal Wiring > Trigger Inputs
Otherwise, press Save, and send your file and basemap to tech@linkecu.com or make a post in the forums about it: https://forums.linkecu.com/index.php?/
5. Is your Base Timing correct?
So lets presume you've worked through the above and your triggers are setup correctly, the ECU can read them, and they are without noise or interference.
We need to set one last trigger related issue, base timing.
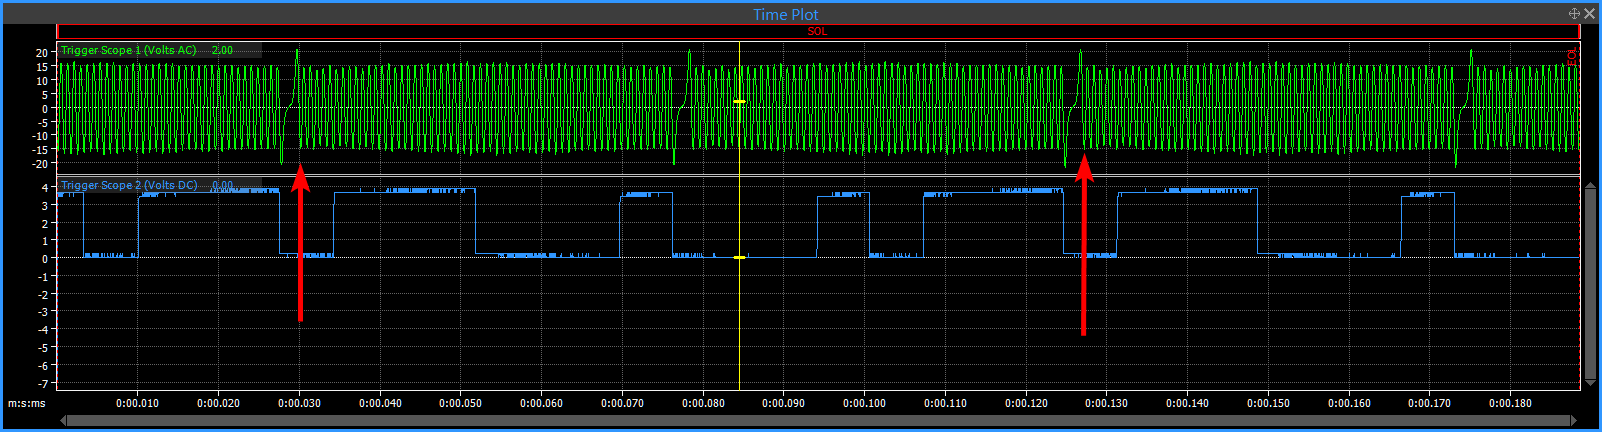
The above is a trigger scope, between the red arrows show 1 engine cycle, 2 revolutions (of a 4 stroke). You can see the blue trace after each arrow repeats, it does this for every cycle. Somewhere between the red arrows cylinder 1 reaches TDC, it might be on the red arrow, it might be 10 or 20, 90 or 180 degrees after the red arrow, it could also be before the red arrow too, but what we need to know is how many degrees is it between TDC on cylinder 1 and the red arrow, our sync tooth (in this example - some applications are different).
You can measure this with a degree wheel but the easiest option is to use a timing light.
Setting base timing is also out of the scope of this article, for details see this topic of the help file:
G4X ECU Tuning Functions > Triggers > Calibration
Once you have determined your base timing, it's possible you're "360 degrees out", which means your coils are firing at the right time, but on the wrong stroke, so:
If your base timing is greater than 0, (20 for example) then subtract 360 from it and try -340.
If your base timing is less than 0, (-90 for example) then add 360 to it and try 270.
6. Ignition Test
We've covered triggers, now lets move on to whether your spark plugs are working.
To do this test, I like to take all coils off, place a spark plug in each coil, and test all of them at once.
If you have a wiring or setup issue, and you take the coils off one at a time, it is possible to test 1 coil, and another coil is also firing in the head (when it shouldn't be).
What we're going to do is take all factors out of the equation and ask simply "When the ECU tries to drive the coils, do they work?"
To do this, in PCLink, on the left hand menu bar, go to ECU Settings, Ignition > Ignition Test.
Ensure the coils and plugs are positioned in a safe place.
As you select each ignition drive, the corresponding coil should fire (this is in coil order, not firing order).
Depending on your ignition setup, more than 1 coil may fire at a time, you will need to familiarise yourself with your ignition setup to determine if this is correct or not.
Check your firing order
Your Ignition (and later Injection) drives should be wired to the cylinder, not to the firing order (except the Kurofune - contact tech for details)
So Ign 1 should go to Cyl 1, Ign 2 to Cyl 2, ...etc
In PCLink, in the ECU Settings menu on the left, look at Configuration > Firing Order Table.
Press F1 to read the help and check your firing order against the "Engine Specific Information" topic in the help file, factory manual, or known good information.
If the spark is weak
You may have a wiring issue, weak battery, blown fuse, relay or bad ground.
However, there may be another issue. With the exception of the E36 Plugin, none of our ECUs have built in ignition coil amplifiers.
Check whether your coils have a built in ignition module by measuring the resistance between the enable pin, and the ground pin. If it is fewer than ~50 Ohms, you need an ignition module, if it is on the order of Mega Ohms, then it has them built in.
Alternatively you may have an ignition coil amplifier somewhere else in the wiring harness. Look for it and check its operation.
Gotcha: Sometimes the ECU will make a spark in the open air without an amplifier, sometimes it will even be enough to let the engine idle, but eventually it will not be enough power to run, especially under boost. It will feel like a soft ignition cut limiter.
If there is no spark
Perform the above checks anyway, but also check wiring, fuses, relays, spark gaps etc.
5. Injection Test
This is functionally the same as the above Ignition test, but instead asks the question "When the ECU tries to drive the injectors, do they work?".
Firstly deactivate your fuel pump, you can sometimes pull the fuse (be careful it's not shared with the injectors), unplug the pump, or you can deactivate it in PCLink if it is ECU controlled, buy going to the fuel pump settings and deactivating it.
Then, Under Fuel > Fuel Setup > Injector Test.
Select each injector and test one at a time, listen to, or even touch each injector to ensure that it is the correct injector to be firing. Again this is in injector drive order, not firing order.
You may have injectors paired up, you will need to determine yourself whether this is correct.
Low Impedance Injectors
Will not work in G4X under load, will not work on G4+ except for Fury, Xtreme and Thunder.
To check if you have Low Impedance (low-Z) injectors measure the resistance across them, if it is less than 5 Ohms, then they are low impedance and save for the exceptions above, will require ballast resistors.
If your injectors don't work, check wiring, power, relays, fuses etc.
7. Air
Not really the fault of our ECU, but please check that the engine is getting air.
During cranking your MAP signal should read from atmospheric (about 100kPa or 14.5 psi). If it doesn't your MAP sensor might not be plumbed in properly or the throttle may have failed)
Inspect the throttle, check carefully because I've seen the butterfly shaft shear internally, so they will appear to function from the outside, PCLink may even report that the throttle is working, but because the butterfly shaft is broken, it will never let air in.
Check your idle method is working also.
8. Limits and sensors
Back in Section 2 we looked at the Runtime Values Window, and we checked if Engine Kill or any fuel or ignition limits were active. Engine Kill active means there is a 100% fuel and ignition cut, this kills the engine. It's possible but unlikely that some other fuel or ignition cut is active too, so lets check those.
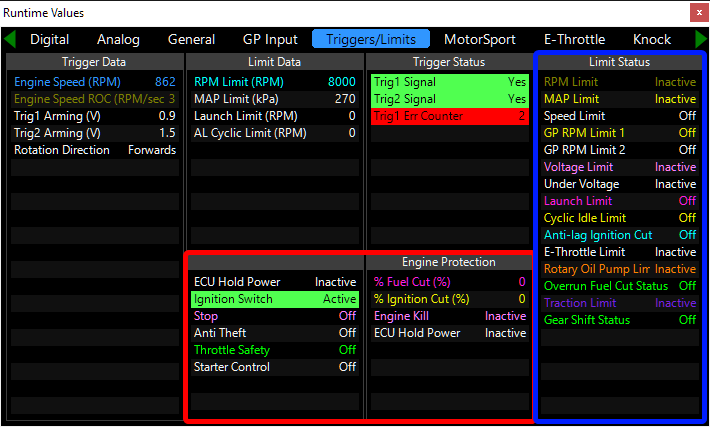
If Engine Kill is "Active", consider the red highlighted region of the Runtime Values Window and read this topic in the help file:
G4X ECU Tuning Functions > Runtime Values and States > Engine Protection
It is also possible that some Limit is stopping the engine from starting, this could be due to a bad setting, or a failing sensor. Consider the Blue section of the Runtime Values Window and visit the respective active limit.

Any RPM Limit less than 300 RPM will cause the engine to stall, the above table will never allow the engine to start, and may even cause an Engine Kill. Read this topic for advise on limits:
G4X ECU Tuning Functions > Engine Protection
Your Link ECU is able to detect when a sensor has failed.

The above ECT settings are not unusual, if the sensor becomes unplugged the ECU will detect the voltage from that sensor has gone to 5V. Similarly, if the sensor has a dead short to ground the ECU will detect the voltage is at 0V, as above, this is outside out 0.05V to 4.95V range, so the ECU will flag that the sensor has failed. When the ECU detects a sensor has failed, it assumes the error value for the sensor, this should be set to a fail safe value. For ECT we typically set this to anything more than the temperature the cooling fans should come on at, this is so that if the sensor fails, the fans will come on, this will save the engine from cooking itself.
It is however possible that an extreme combination of Error values and RPM Limits is stopping the engine from starting, this is especially easy while you first install and setup an ECU, it's also possible for these faults to happen over time as a result of wear and tear.
If the above sensor failed, and the below RPM Limit table was set (it is an extreme example), then the engine wouldn't start.

So clear your fault codes, cycle power (some fault codes require this to clear). If you have a fault code that returns, address it before you attempt to start your engine. Do not increase the rev limit above, fix the sensor or wiring first.
I have given an example here for the RPM Limit, but it is equally possible for the MAP Limit or a GP RPM limit for something like Lambda, fuel pressure or oil pressure to cause the same issue, so consider all of your limits and all of the sensors associated with them.
Consider also that the sensor hasn't failed, but that the item measured has genuinely failed, make sure to check fluid levels and functionality, it is possible you genuinely have no fuel pressure and this is why the ECU refuses to let the engine start.
9. Fuel and Ignition
If you have confirmed all of the above, then we're coming to some of the last possibilities that your ECU is the reason your engine won't start. Engines are incredibly robust and will start and run on a very wide set of parameters, so we're not going to be asking questions about how good the tune is, likely we don't even care what the fuel table looks like at this stage.
We've determined that the ECU is receiving the correct trigger information, that it knows the timing of this information, and that it is able to drive the coils and injectors when it needs to. We've made sure that the ECU isn't stopping the engine from starting, so lets check that the ECU is happy with the fuel calculation and ignition timing.
In PCLink, in the main layout, go to the "General Logging Tab"
- Press F8 to start logging (Fn + F8 - or go to Logging along the top bar and press Record)
- Attempt to start your engine.
- Press F8 to stop logging
Notice the "Injection Effective PW" and "Injection Actual PW", unless you have huge injectors, these should be between 5-15ms, they should also have a constant offset from one another, if either is 0 or 65ms or some weird number, then check your injector settings, see below for some of the fuel settings gotchas too.
Check your Dwell at the bottom too, it should be between 2-8ms, if it's zero or thereabouts then you have some setting with your ignition wrong OR I have seen trigger sensor polarity cause this, but you already checked that above, so shouldn't be a problem right?.....right?
Finally, if you have ITBs you may not have a MAP sensor, go to Fuel > Fuel Setup > Fuel Main and check your "Equation Load Source" is set to Load=BAP.
If you have a plugin, be sure to read the manual that came with it, there is a guide included on first starting, including how to adjust the master fuel.
10. Last Possible Solutions
By now we're getting to the last of the possible issues, engines are surprisingly robust and if you've made it to here and followed our instructions properly, chances are the issue isn't with the ECU.
We checked a lot of stuff, but we made some assumptions, just because the ECU can drive the coils and injectors, doesn't necessarily mean they're firing when we crank, or that the pump is working well enough to get the fuel into the cylinder or that the valves are even opening or that there isn't a hole in your piston or crank case.
repeat the Step 4 and 5 ignition and injection processes, except witness the spark firing when you crank and feel/listen (closely) for the injectors firing.
Inspect your spark plugs, gap and check their specification against the manufacturer recommendation.
When inspecting the plugs, if they're wet that means the injectors are in fact working (this is good), you may also be able to crack your fuel hose fitting at the rail and activate the fuel pump (you can do this in PCLink with the test function if your pump is ECU controlled) make sure to fasten a cloth around the fitting and be careful, fuel will hopefully go flying everywhere, please use appropriate PPE and do not perform this test near an open flame.
11. Ask someone for help.
There are a few places to ask for help and guidance on why your engine won't start.
Start with the dealer who provided you the ECU, package or basemap you're using. They may know the cause.
You can contact Link Tech support for advice by clicking "Submit a request" in this Knowledge Base and attach the below information:
- The basemap in your ECU right now, click File > Save
- Your trigger scope from earlier.
- The log file of an attempted start from earlier.
- Your base timing, which you checked with a timing light.
You can make a thread in the forums here:
http://forums.linkecu.com/index.php?/
Comments
0 comments
Article is closed for comments.